Configuration
The configuration of PicGo varies from system to system.
- Windows:
%APPDATA%\picgo\data.json - Linux:
$XDG_CONFIG_HOME/picgo/data.jsonor~/.config/picgo/data.json - macOS:
~/Library/Application\ Support/picgo/data.json
In Windows, you can find the configuration at:
C:\Users\你的用户名\AppData\Roaming\picgo\data.json
In Linux and MacOS, you can find the configuration at:
~/.config/picgo/data.json
Basic Operations

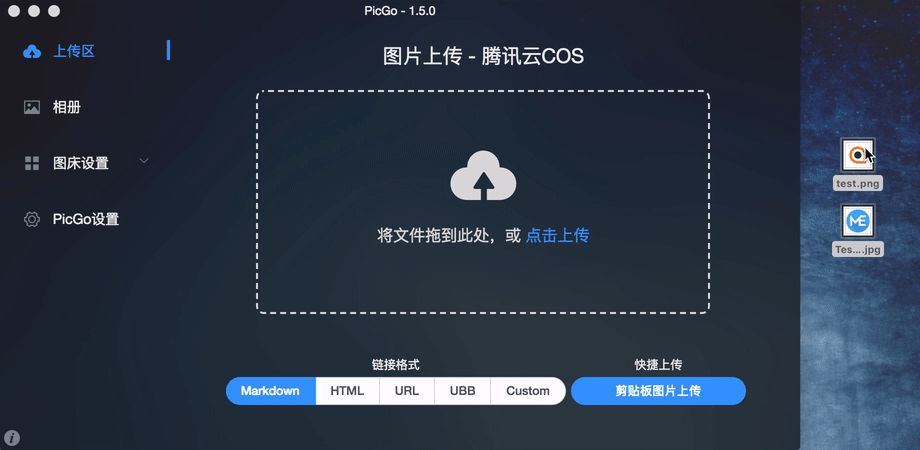
Upload Area
PicGo's upload area supports drag and drop or open your folder to upload images.
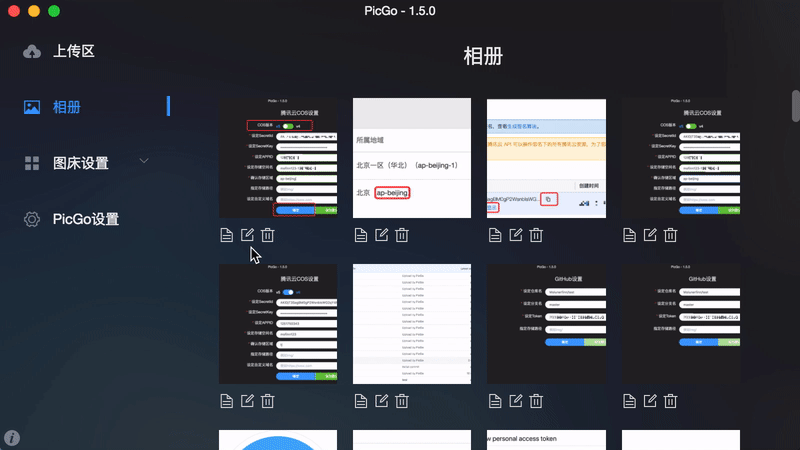
Album Area
PicGo's album area supports to view all images you have uploaded. You can click on the image to preview. You can also click the icon below to copy the image link or delete the image (this will delete the local data to make your images disappear in your album area)
Edit the images in the album (v1.5)
If you need to change the URL of your image after uploading, such as changing HTTP to HTTPS or adding URL suffix (e.g. ?imgslim by Qiniu Cloud). PicGo can make it easier for you to manage you images.
Select the image link format (v2.0)
You can select the image link format in the album area since PicGo 2.0:

Img Area
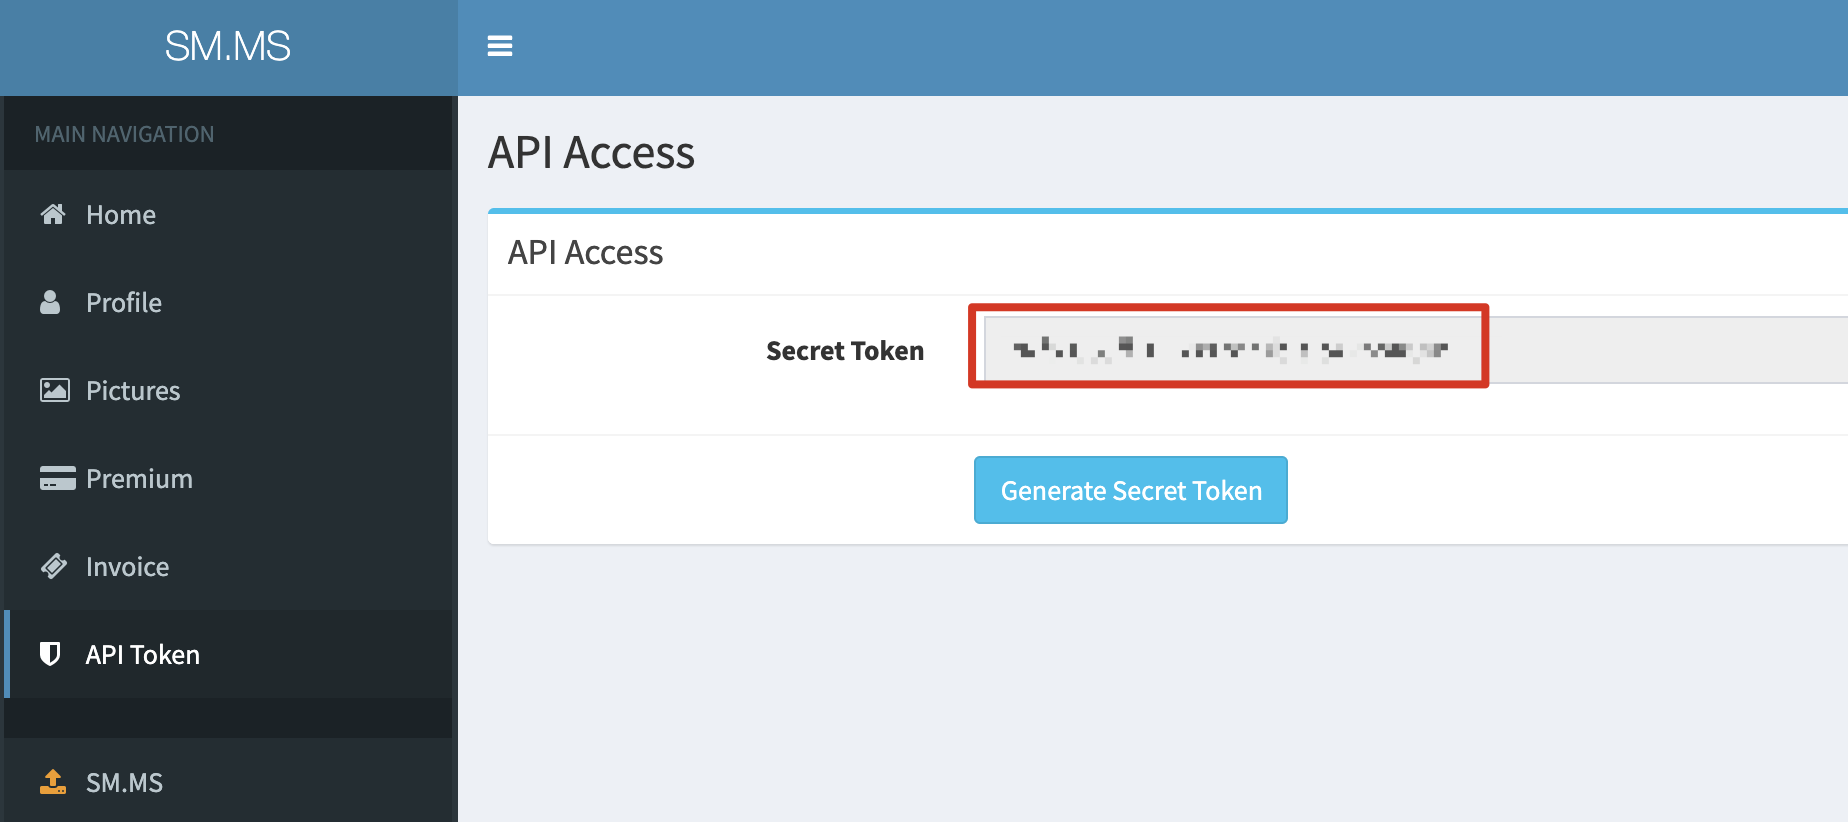
SM.MS 2.3.0+
The configuration item:
{
  "token": "",                                 // your api token
  "backupDomain": ""                           // v2.3.1 Support alternate upload domain, optional. Recommended smms.app
}
Sign up and log in sm.ms (opens new window) to get your token.
Qiuniu Img
The configuration items:
{
  "accessKey": "",
  "secretKey": "",
  "bucket": "",                               // storage bucket
  "url": "",                                  // customized domain
  "area": "z0" | "z1" | "z2" | "na0" | "as0", // storage area
  "options": "",                              // URL suffix
  "path": ""                                  // storage path
}

You can find your user key in your Qiniu portal (opens new window). Note that, you should determine your own storage space:

You need to fill the area in the configuration file according to this (opens new window):

When configuring your storage area, you need to set the upload address to Qiniu Clould or your customized domain name (http:// or https:// is required):

The URL suffix is usually used when you set some processing parameters using image processing, such as the image slim.
Tencent Cloud COS
The configuration items:
{
  "secretId": "",
  "secretKey": "",
  "bucket": "",                               // storage bucket, note that v4 is different from v5
  "appId": "",
  "area": "",                                 // storage area
  "path": ""                                  // storage path
  "customUrl": "", 														// customized domain
  "version": "v5" | "v4" 											// COS version
}
PicGo v1.5+ support both Tecent COS v4 and v5.
COS V4
v4:

You should log in your Tecent portal and open secret key adminstration (opens new window):

Find your appId, SecretId and SecretKey.
Please go to the bucket list to open the bucket you need to upload, and see the corresponding area:


If you want to upload images to a folder in your bucket, you need to add your folder path to specify storage path in PicGo (/ is required)
COS V5
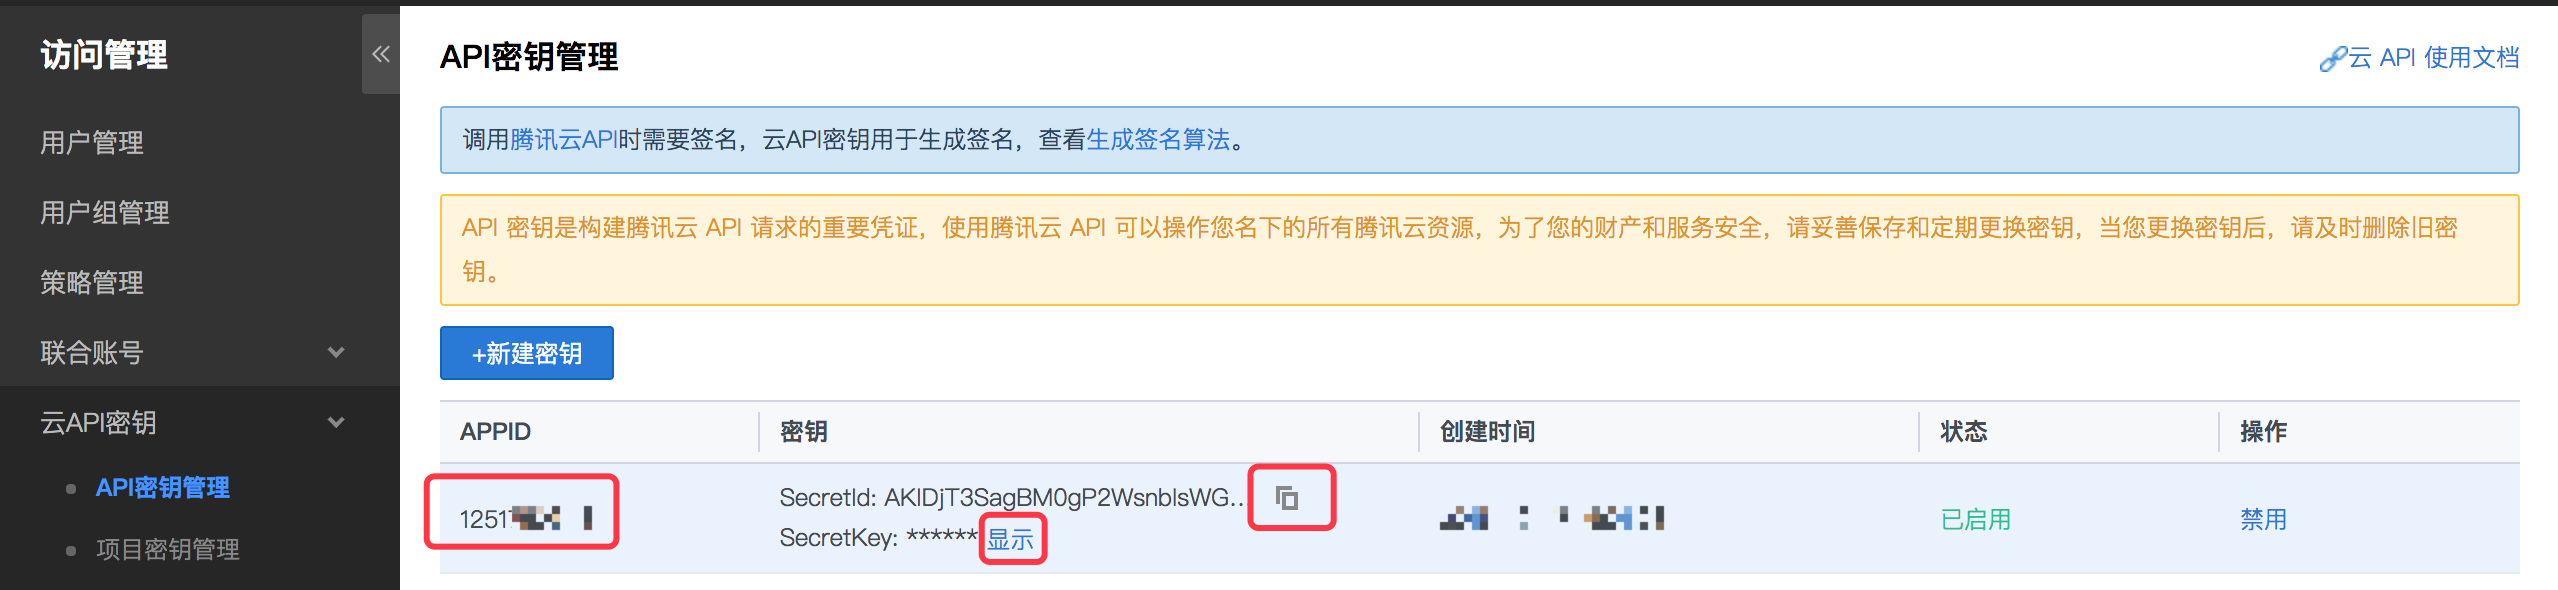
1. Obtain your appId、SecretId and SecretKey.
Access: https://console.cloud.tencent.com/cam/capi
2. Obtain your bucket and storage area.
Access: https://console.cloud.tencent.com/cos5/bucket
Create a bucket. Then find your bucket name and storage area code:

The bucket name of COS v5 is formatted as bucket-appId like xxxx-12312313, and its storage code is also slightly different from that of v4.
3. Select v5 and confirm.
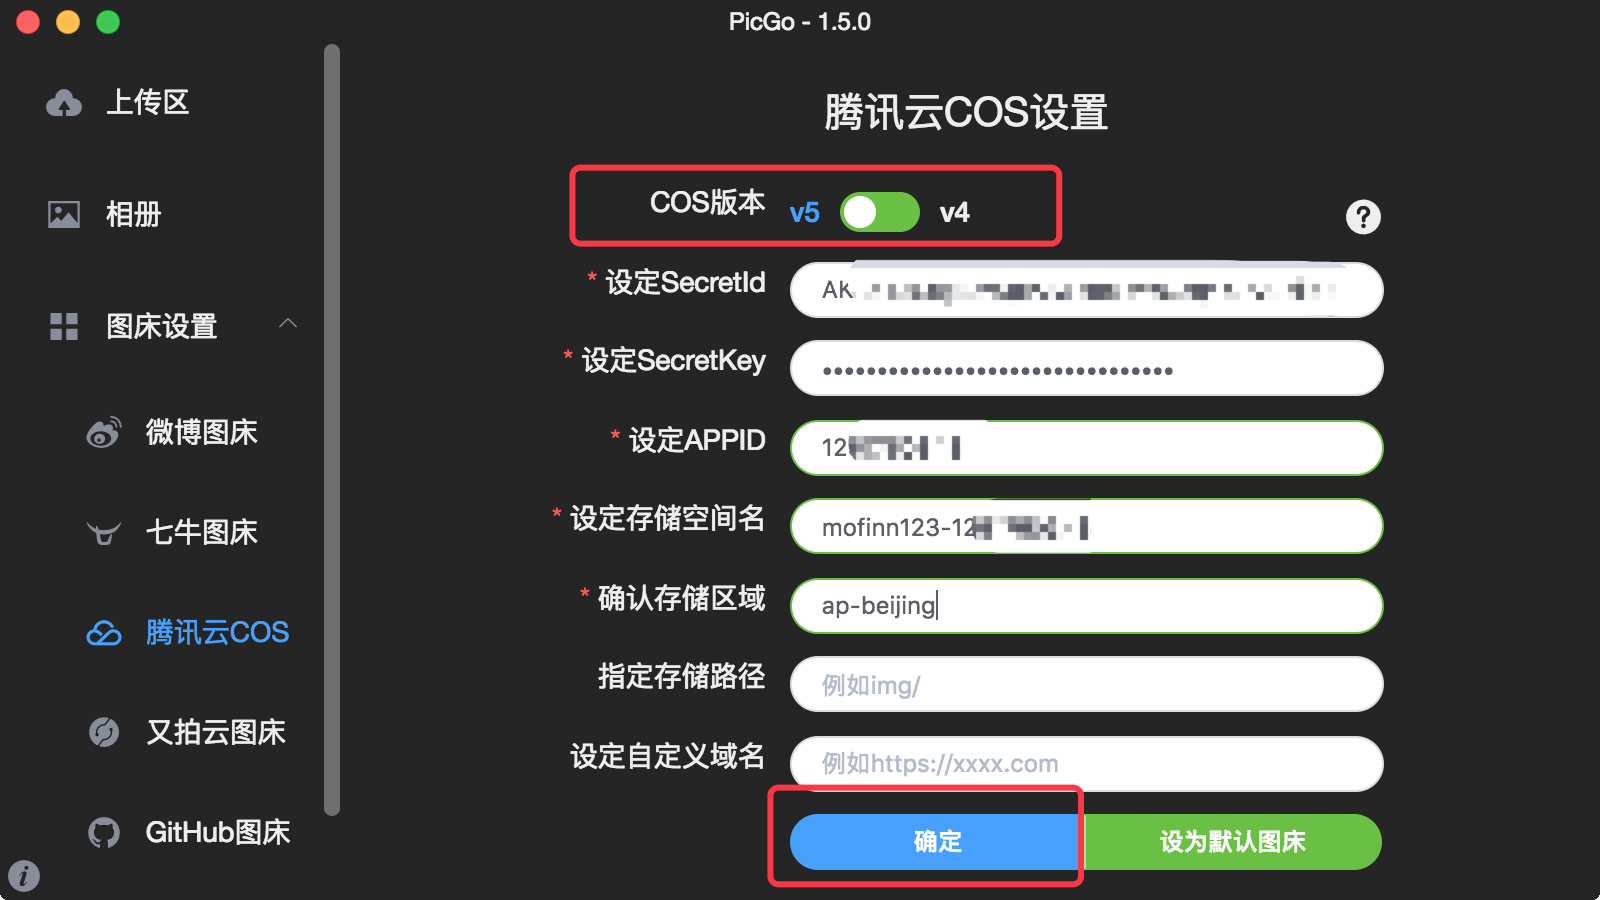
Set as Default Img, so that your Img is Tencent by default.
Upyun Cloud
The configuration items:
{
  "bucket": "",                               // storage bucket, note that v4 is different from v5
  "operator": "",                             // operator
  "password": "",                             // password
  "options": "",                              // URL suffix
  "path": ""                                  // storage path
  "url": "",                                  // customized domain
}


The name of the storage space is your service name, and the domain name is the name assigned by the Upyun or your customized domain.


Since there is no intuitive control panel for Upyun storage, we recommend you to use the third-party web panel to view and operate:
UPYUN-API-Web-Tool (opens new window)
GitHub Img
The configuration items:
{
  "repo": "",                                 // user/repo
  "token": "",                                // github token
  "path": ""                                  // storage path
  "customUrl": "", 														// customized domain
  "branch": ""                                // branch, main by default
}
1. Create and log in your GitHub account.
2. Create a repo for GitHub Img.

3. Generate a token for PicGo:
Access: https://github.com/setting/tokens
Generate new token.

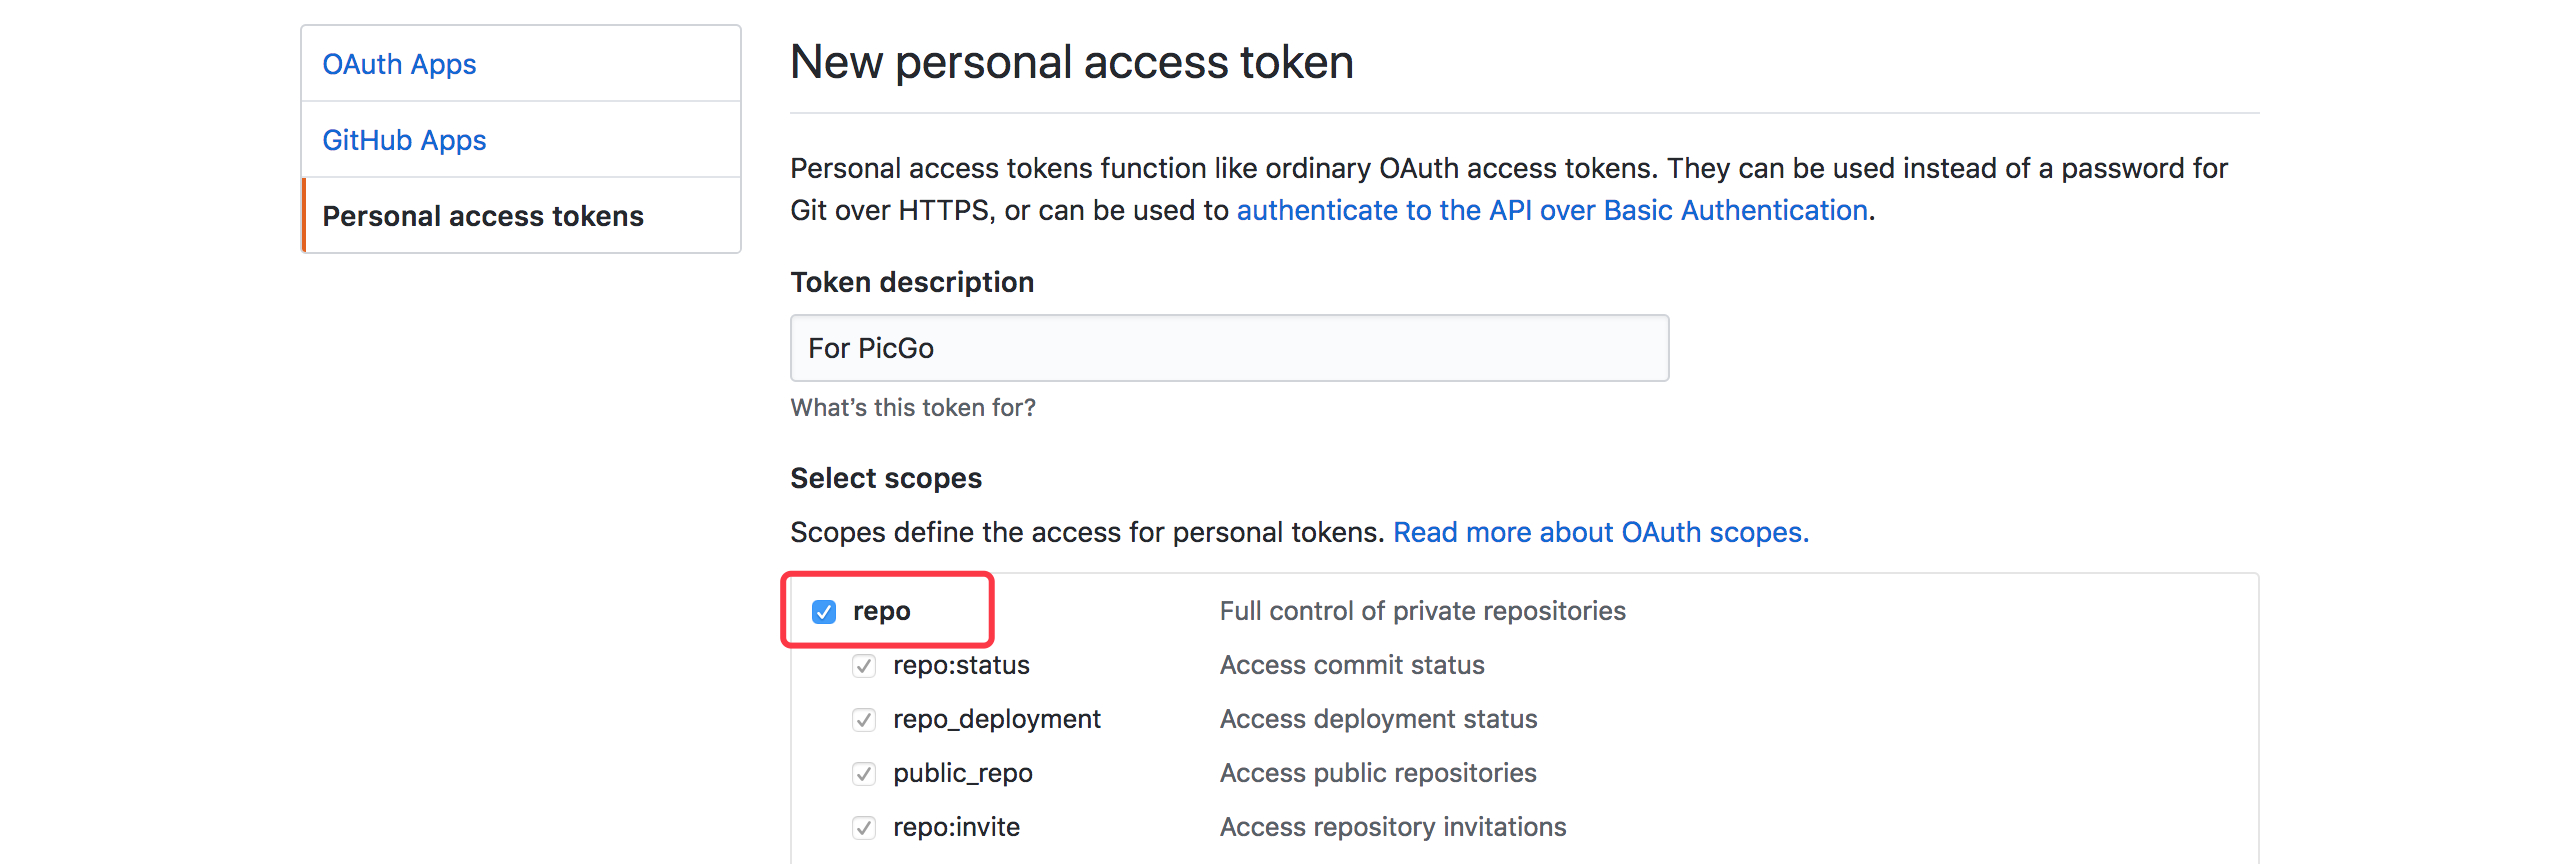
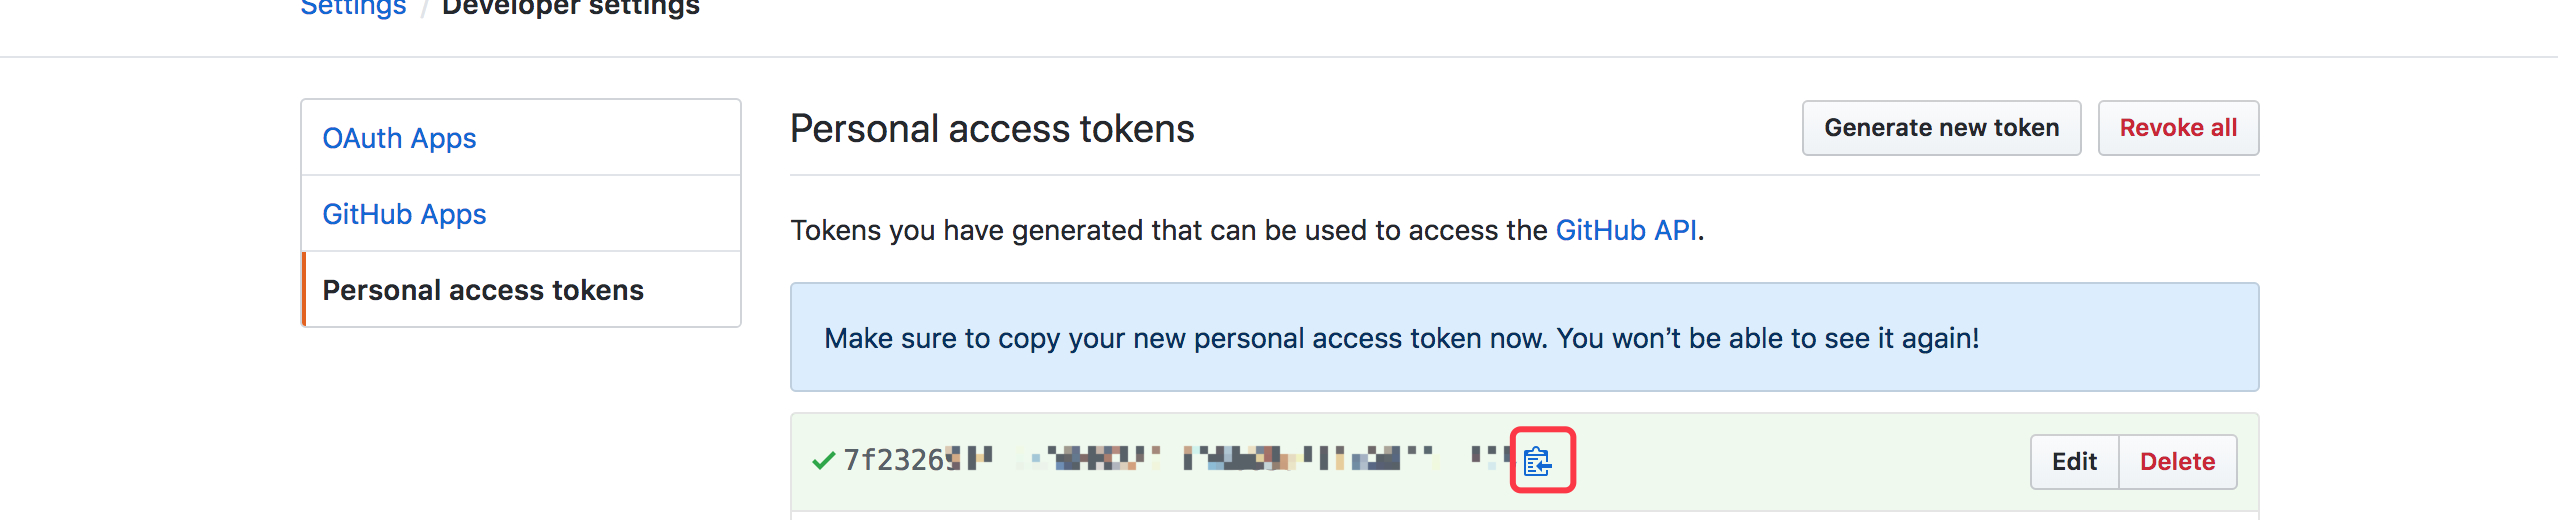
Note: The token generated will be shown only once, so you should back it up.
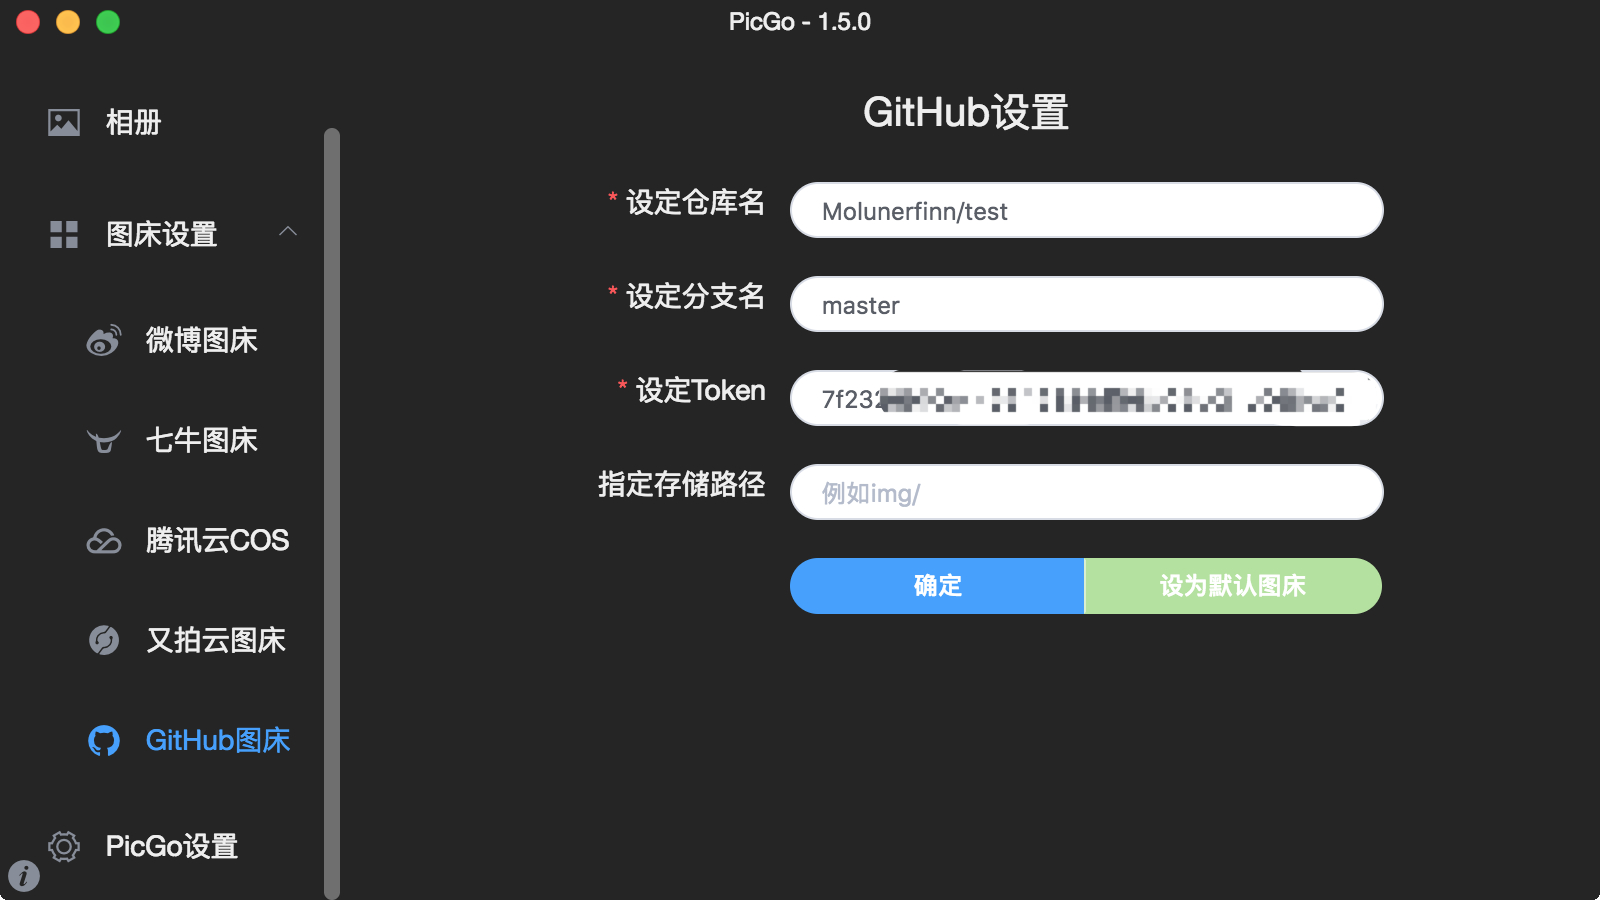
4. Configure your GitHub repository for PicGo.
**Note: ** Use your GitHub repository username/reponame, and selete the branch (main by default). Afterward, you should set it as default Img by set as default.
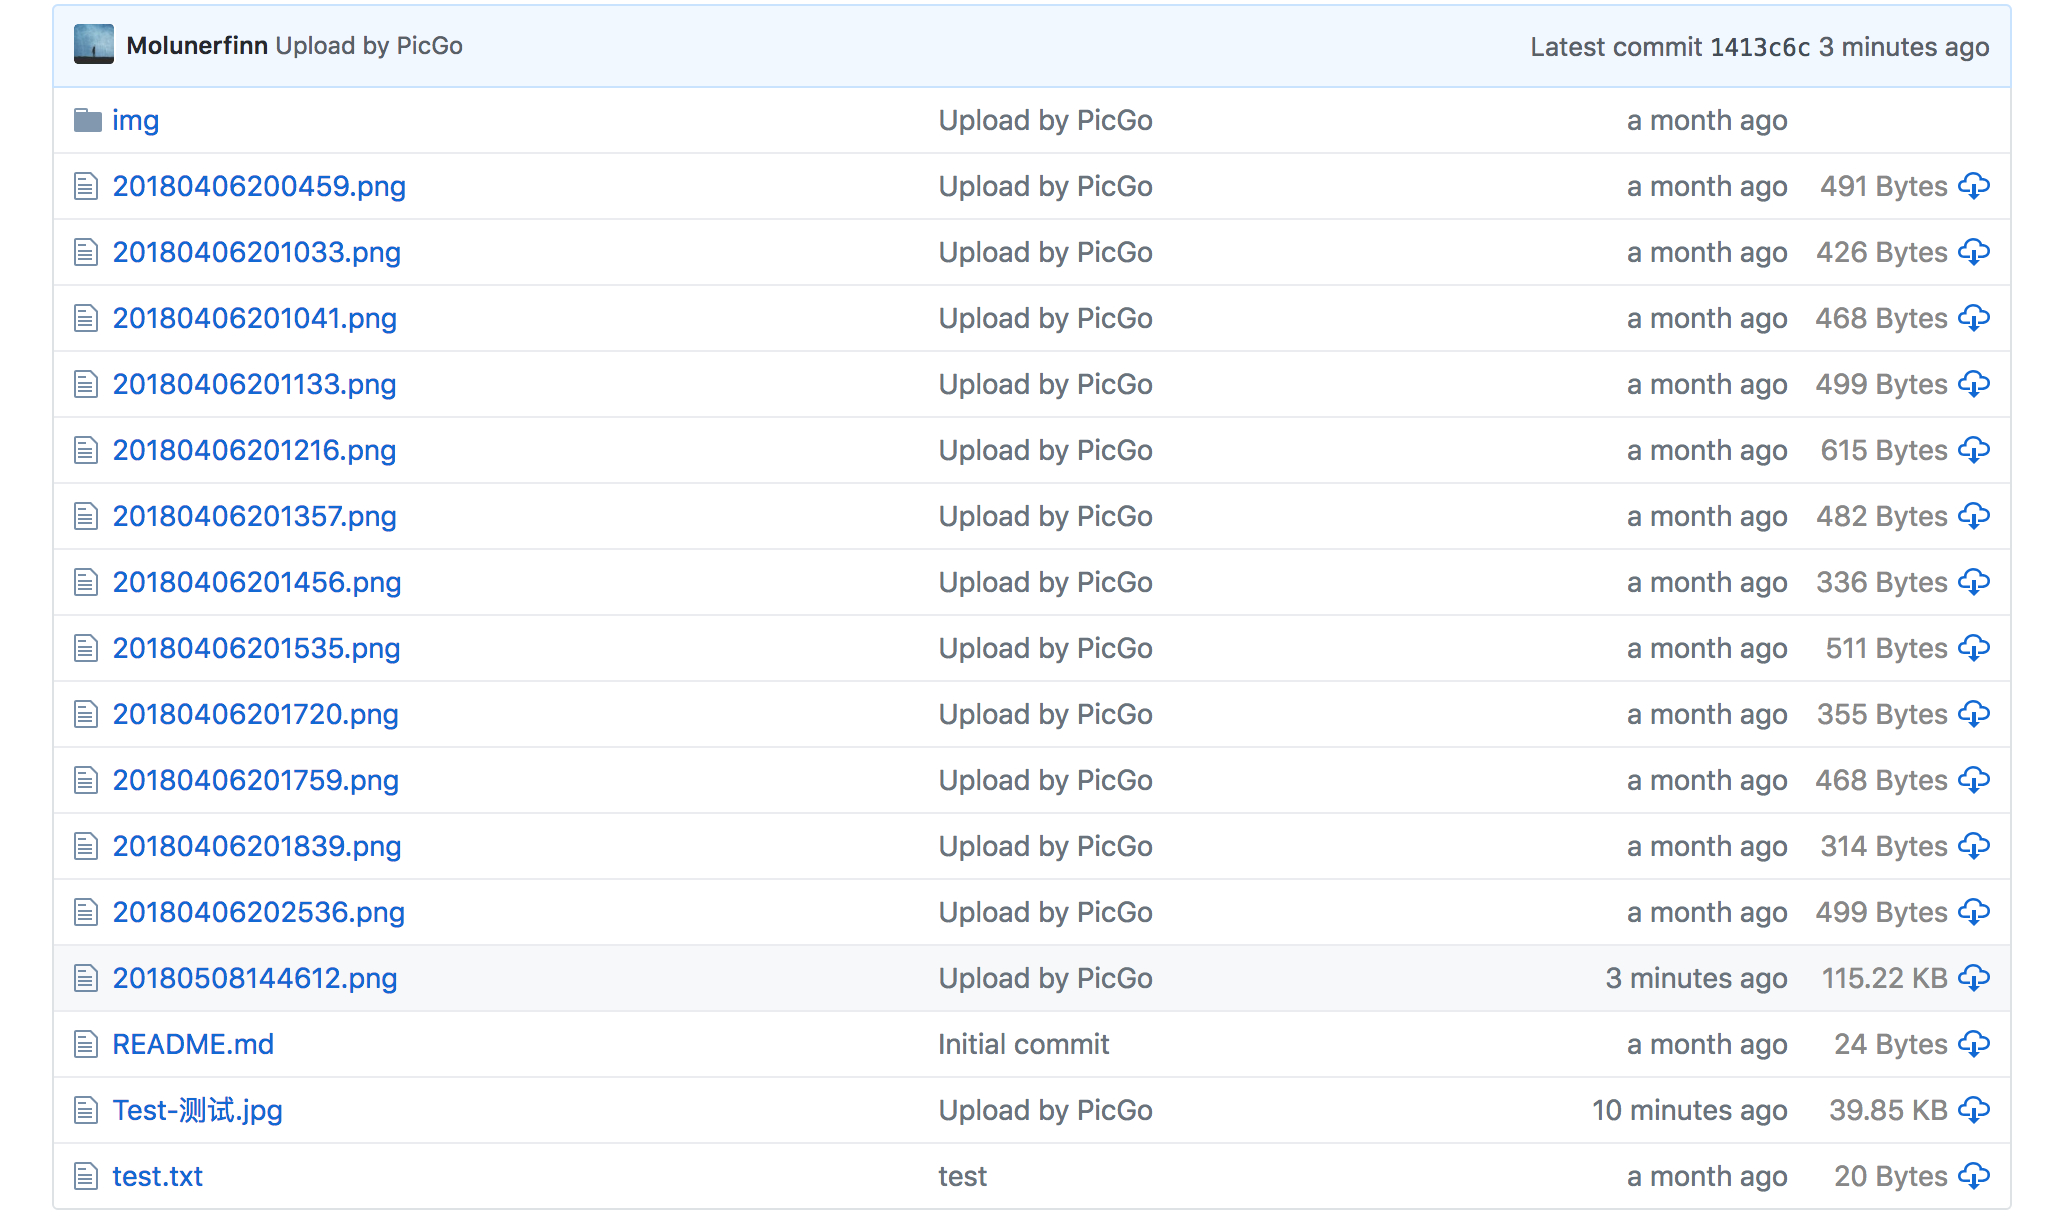
After uploading, you can find that some new images are added to your repository:
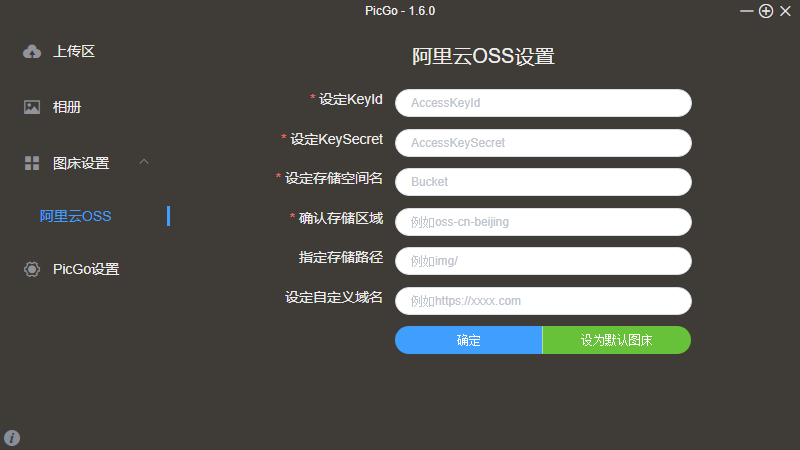
Aliyun OSS
The configuration items:
{
  "accessKeyId": "",
  "accessKeySecret": "",
  "bucket": "",                               // storage bucket
  "area": "",                                 // storage area
  "path": ""                                  // storage path
  "customUrl": "", 														// customized domain
}
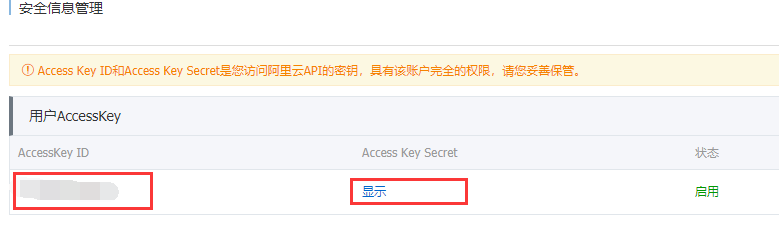
Find your accessKeyId and accessKeySecret in your Aliyun portal (opens new window):
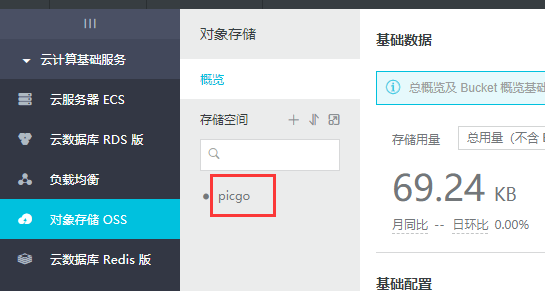
Create a bucket as storage space:
Confirm the code of your storage area (opens new window):
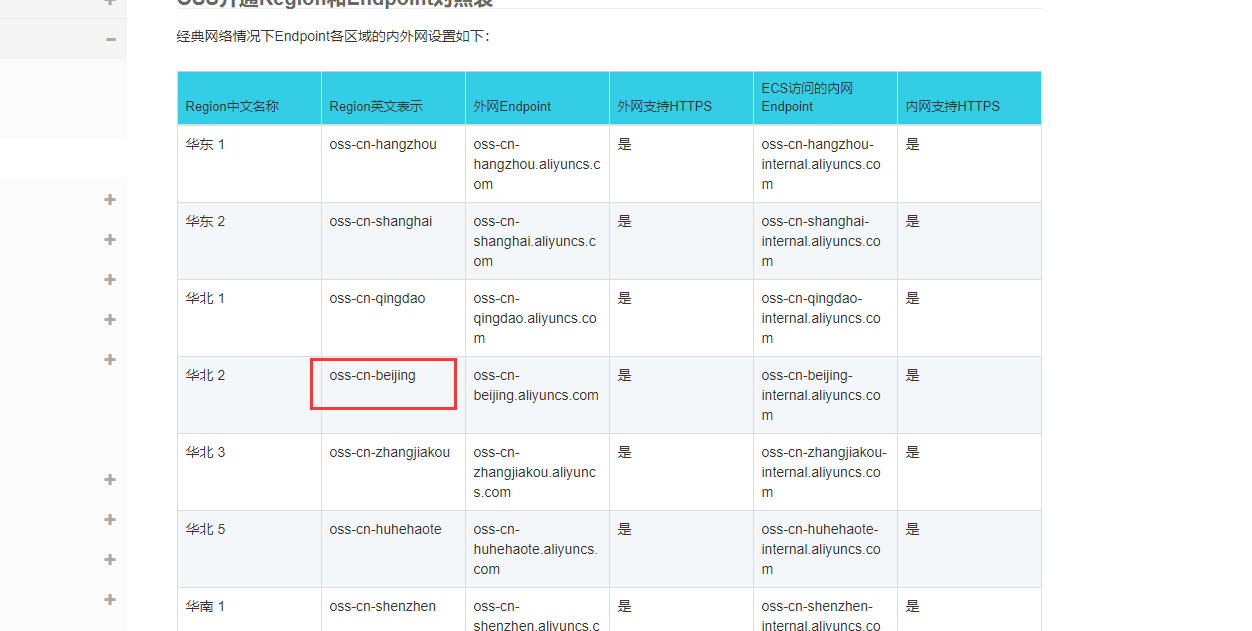
You can also find it in your bucket page:
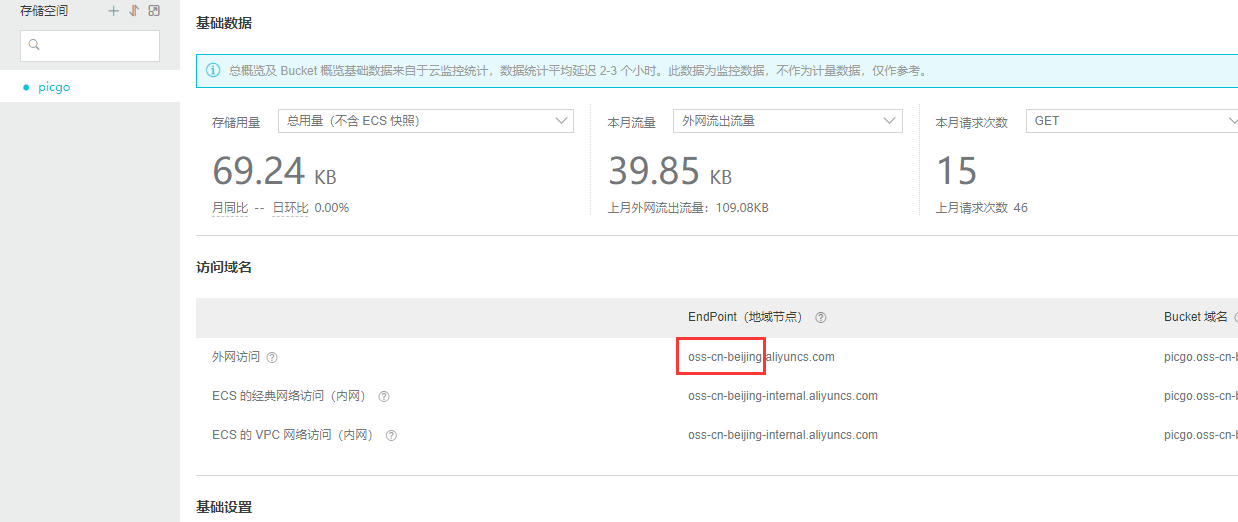
The images uploaded will be stored in path you set, such as img/ (/ is required). Storage path is optional, and you can keep it blank if you do not need it.
Imgur Img
The configuration items:
{
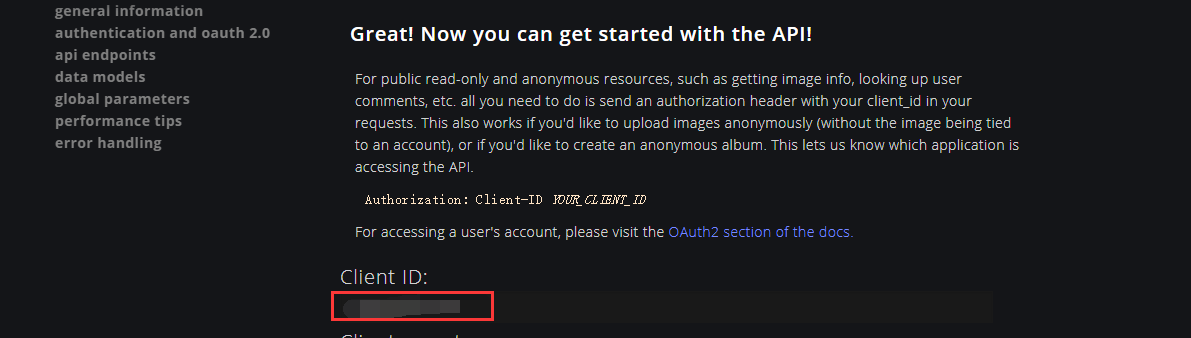
"clientId": "", // your clientId
"proxy": "" // proxy address, only http supported
}
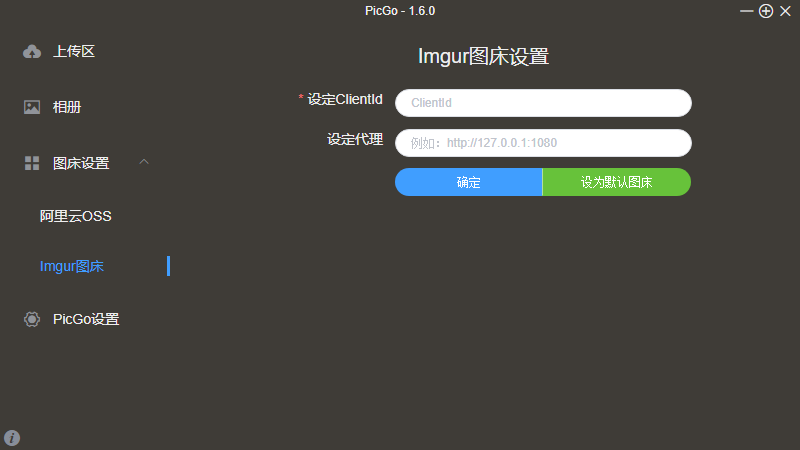
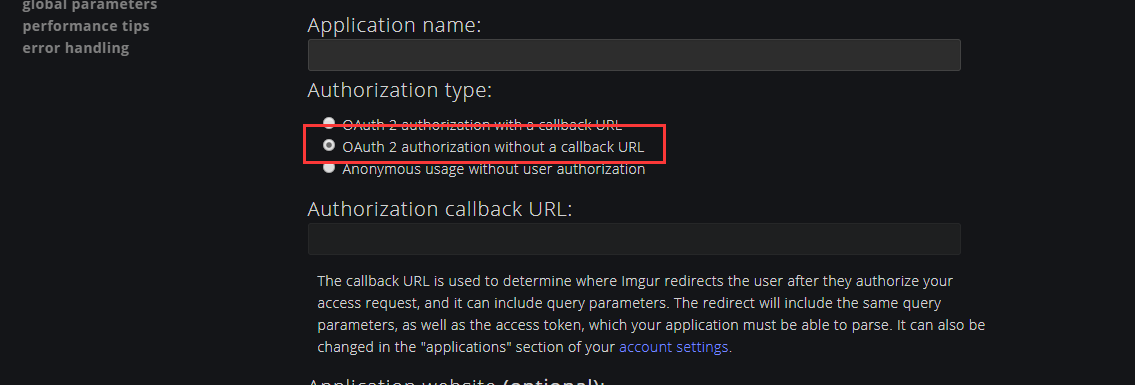
Generate your clientId here (opens new window) after Imgur after logging in (do not need callbackurl here).
Note: Imgur restricts IP and requests in mainland China. If clientId is correct, configure the proxy setting when unable to upload images. Only HTTP proxies are supported by default, so you can consider using SM.MS as an alternative.
Other Imgs
PicGo will no longer add other Imgs support. If you have other Img upload requirements, please refer to PicGo-Core (opens new window), and develop other third-party plug-ins!
PicGo setting
Setting Upload Logs
Since v2.1.0, PicGo support to record your upload logs. If there is any error and other information, PicGo can timely feedback to the developer. You can open the log files in the setting (such as output the success, the failure, or do not output).
Log file size 2.3.1+
Since v2.3.1, the default size of PicGo's log file is 10MB. If you want to change the size of the log file, you can change the log file size in PicGo's settings.

Customized Shortcuts
Since v1.4.0, PicGo support users to use their own shortcuts (Cmd+Shift+P for MacOS, Ctrl+Shift+P for Windows by default). Click the PicGo setting sidebar and open the shortcut panel to set your customized shortcuts (v2.2.0+). You can choose to disable or enable the shortcuts:

Click edit, press the shortcut keys in dialog and confirm. You can also set combined shortcuts.
Since v 2.2.0, PicGo add the shortcut system for its plug-ins, and the shortcuts will be shown in the shortcut panel.
Customized Link Format
PicGo preset four image link formats, i.e., Markdown\HTML\URL\UBB. You can also use your own link format Custom. Click customized link format in PicGo setting, then you can use your customized links.
TIP
PicGo supports $fileNamesince v2.1.2.
PicGo supports $extNamesince v2.3.1.
Upgrade Assistant
PicGo will inform you to upgrade if your version is not the latest. You can turn it off in the setting. We recommend you to turn the upgrade assistant on, for the new version may fix bugs and add new features~
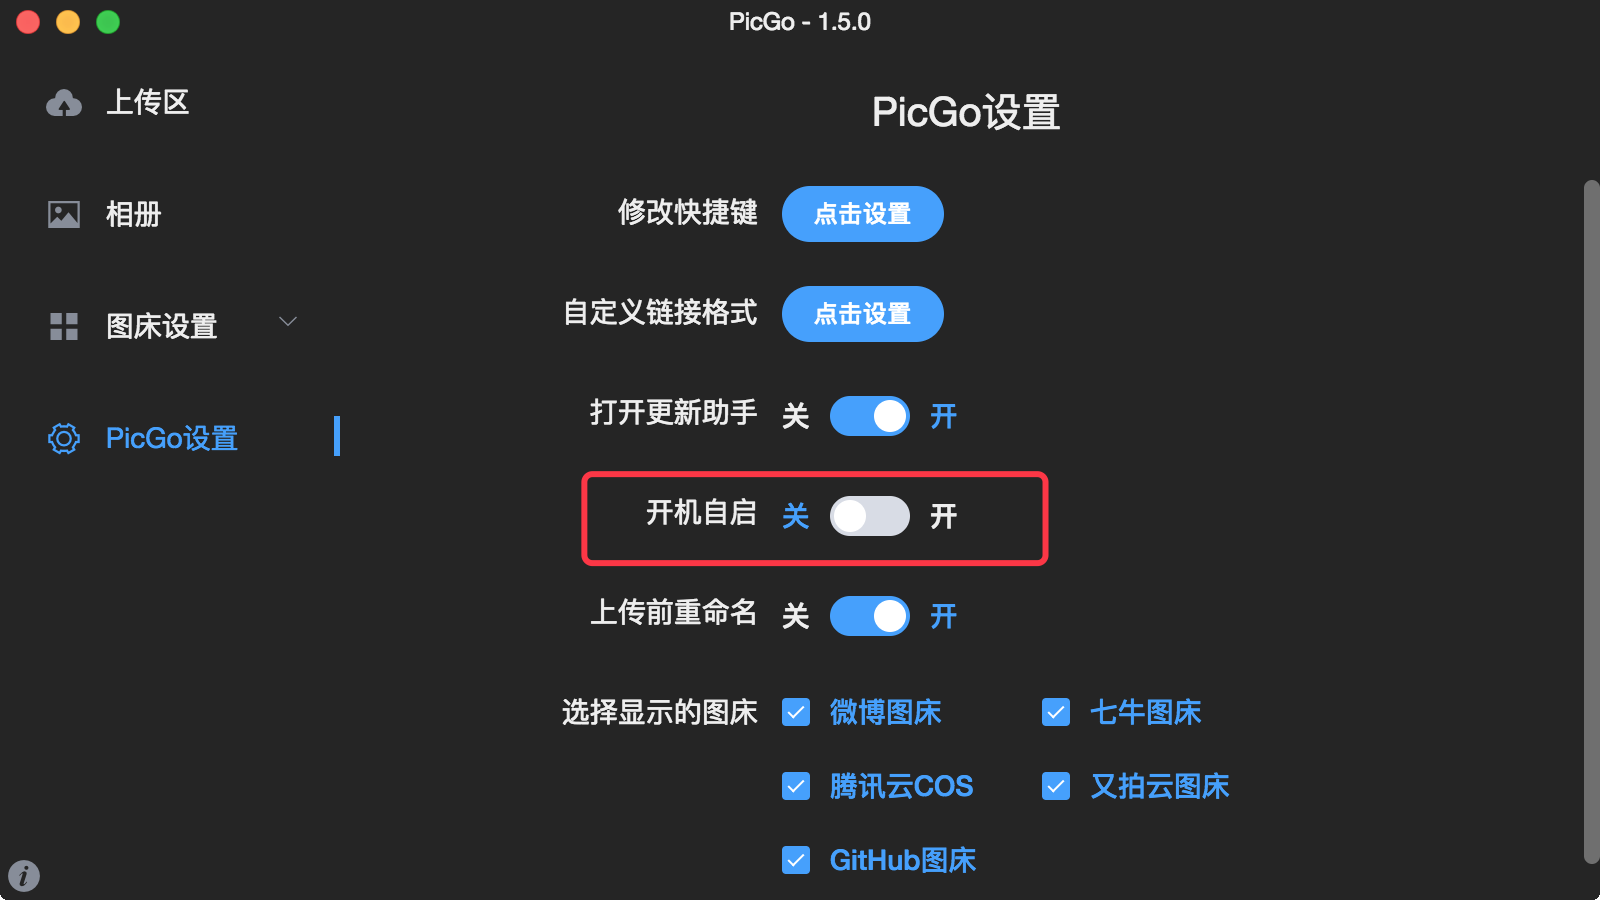
Bootup Auto-start
You can choose to auto-start PicGo when booting up.
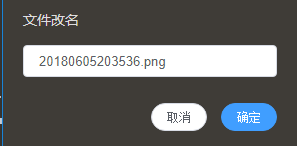
Mannually Rename before Uploading
PicGo allow you to rename your images before uploading:
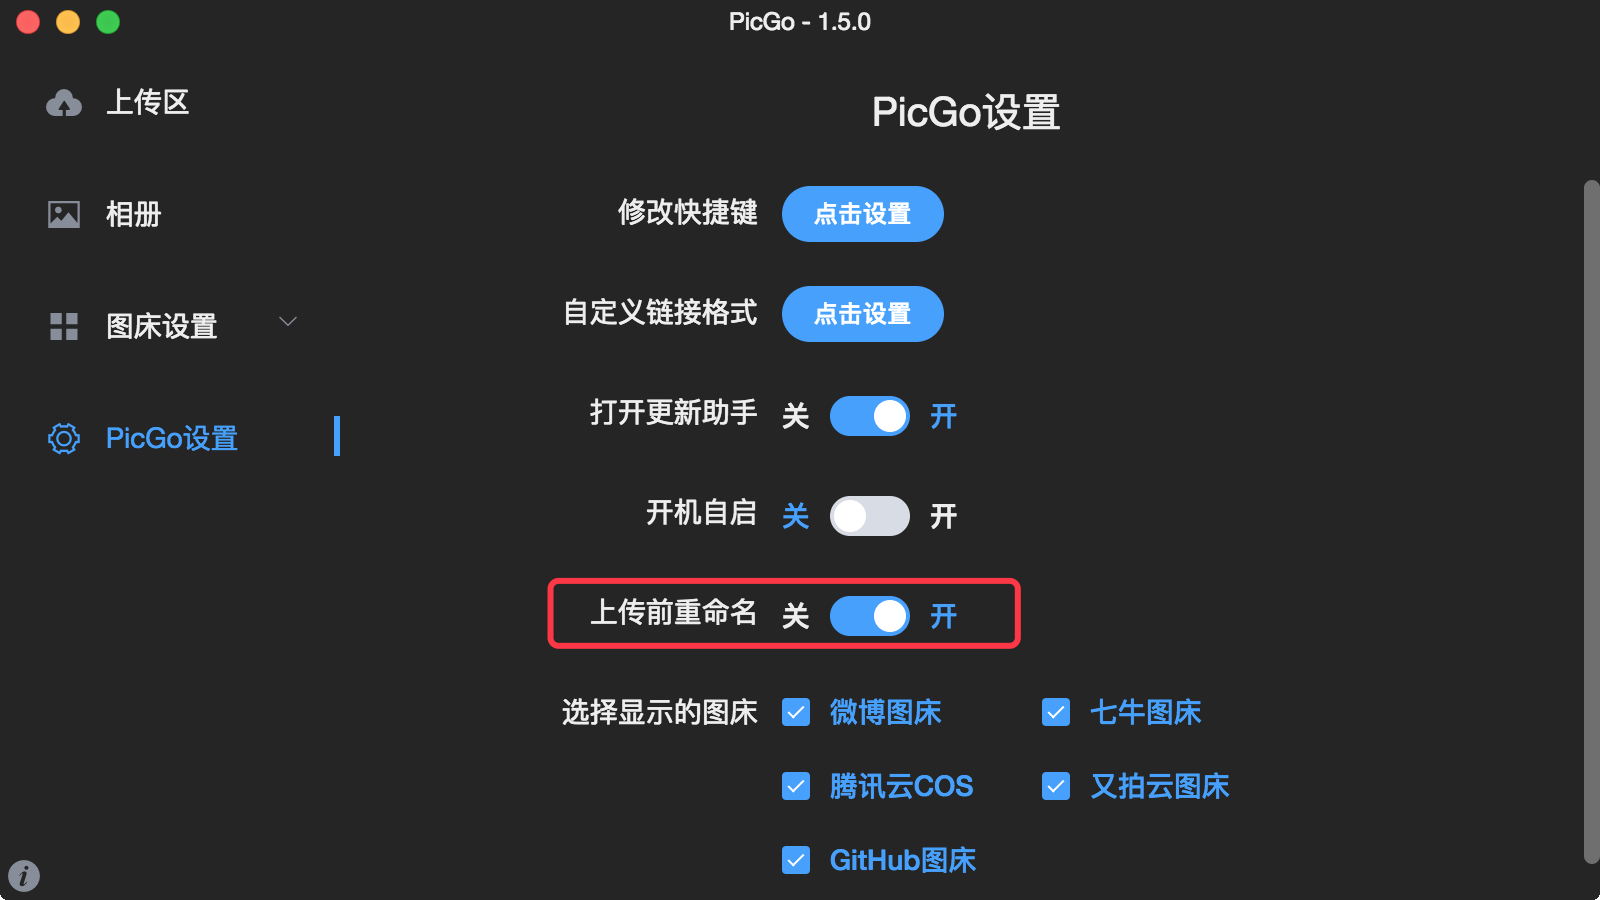
Then you will see a window to rename your image. If you do not want to many any changes, just confirm, cancel or just close it. Besides, this feature also supports uploads in branch:
Auto Rename with Timestamp
When enabled, the uploaded file name will be automatically replaced with the timestamp:
Select Img to Display
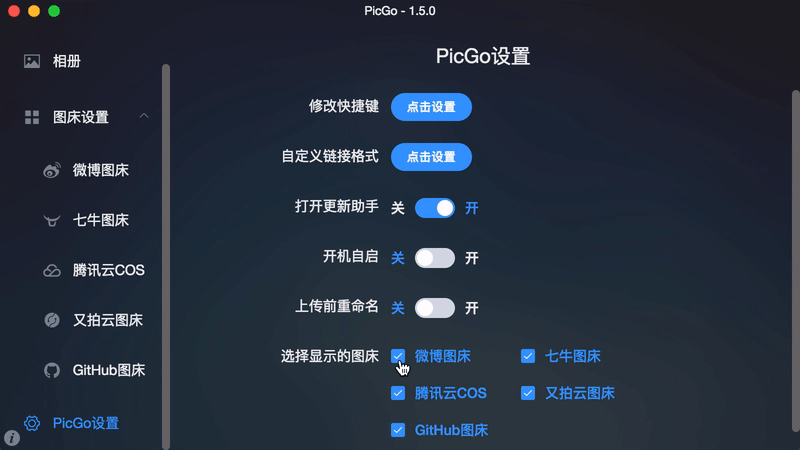
You may not use all of the Imgs that PicGo gives to you. So in order to simplify the display, you can only select the Imgs you want to display, so that there is no scroll bar in the sidebar. It is important to note, however, that this is only show/hide and not exclude functionality. If you hide the Qiniu cloud, you can still upload images via its service.
Upload Status
Every time PicGo uploads an image, the upload status will be shown to indicate that the image is being uploaded. If you find that it doesn't work after you open it, notice if you've turned off the system-level message notification option, because PicGo calls the system-level message notification bar.
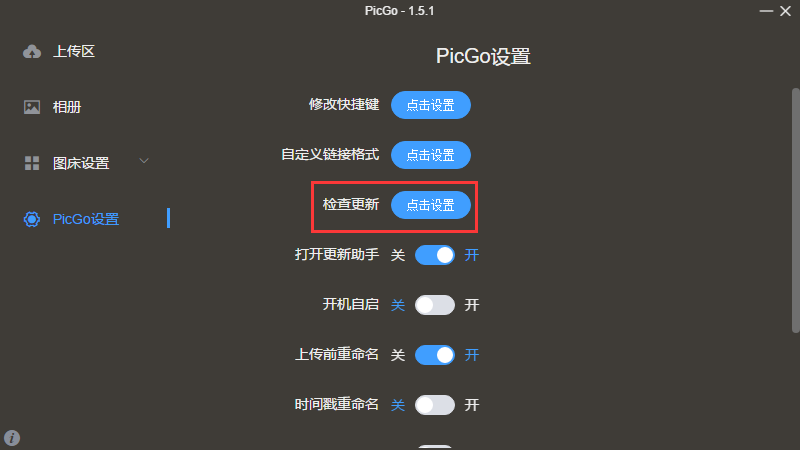
Upgrade Check
Proxy Setting 2.0.0+
Since v2.0, PicGo supports HTTP proxy. You can set it at proxy setting. We do not plan to add sophisticated proxy, because this is related to the underlying parts.

Use Builtin Clipboard to Upload 2.3.1+
The "Use Builtin Clipboard to Upload" feature can be used to replace the previous way of using scripts to get the clipboard pictures. Consider turning on this option if you encounter problems with clipboard uploads, such as process residuals, etc.

i18n Settings 2.3.1+
Since v2.3.1, PicGo supports multiple languages. The default supported languages are as follows:
- zh-CN (default)
- zh-TW
- English

If you want to add language support for PicGo, you can refer to the i18n documentation for PicGo (opens new window) & this PR (opens new window).
Open Configuration Files 2.0.0+
Since v2.0, you can open your configuration files at open configuration files to see your images uploaded, you Img setting, etc.
PicGo-Server Setting 2.2.0+
Since v2.2, a small server is turned on by default to coordinate with other applications to invoke PicGo for uploading. The listening address is the default 127.0.0.1 (localhost), and the port is the default 36677. Of course, you can choose to close it. While we do not recommend you to do so, because it can be implemented with some third-party tools to facilitate the upload workflow.
About how to use PicGo server, you can refer to Advanced Usage.

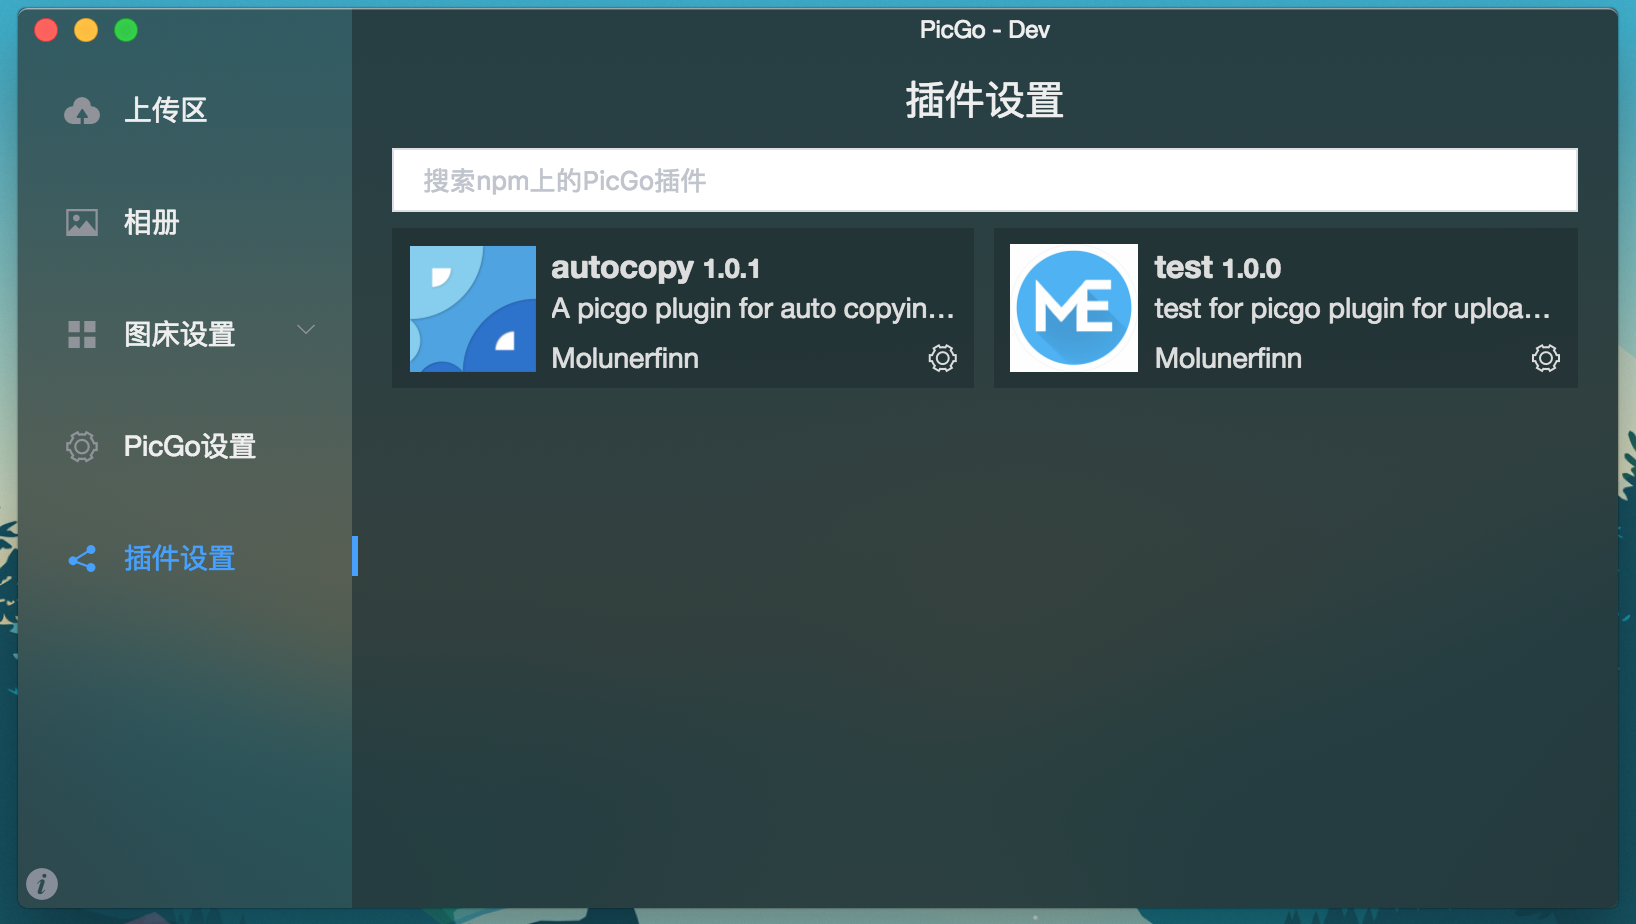
Plug-in Setting 2.0.0+
Since PicGo v2.0, you can install, update, disable, uninstall, configure, and use plug-ins simply on the plug-in settingpage.
Plug-in Installation
WARNING
You must have Node.js (opens new window) to install PicGo plug-ins, because PicGo uses npm to install them.
Search for the plug-in name in the search bar of the plug-in interface. PicGo's plug-ins use picgo-plugin- as prefix, so you just need to use the name after it. For example, if you want to use picgo-plugin-wow, you just need to search wow.
Then you can install it. If you meed the problem "not GUI optimized", you can ask the author to figure out whether it only support CLI. If yes, then you cannot use it on PicGo GUI.
Update, Uninstall and Disable Plug-ins
You can set them all in the PicGo setting. Note that PicGo need to be restarted to enable the new setting.
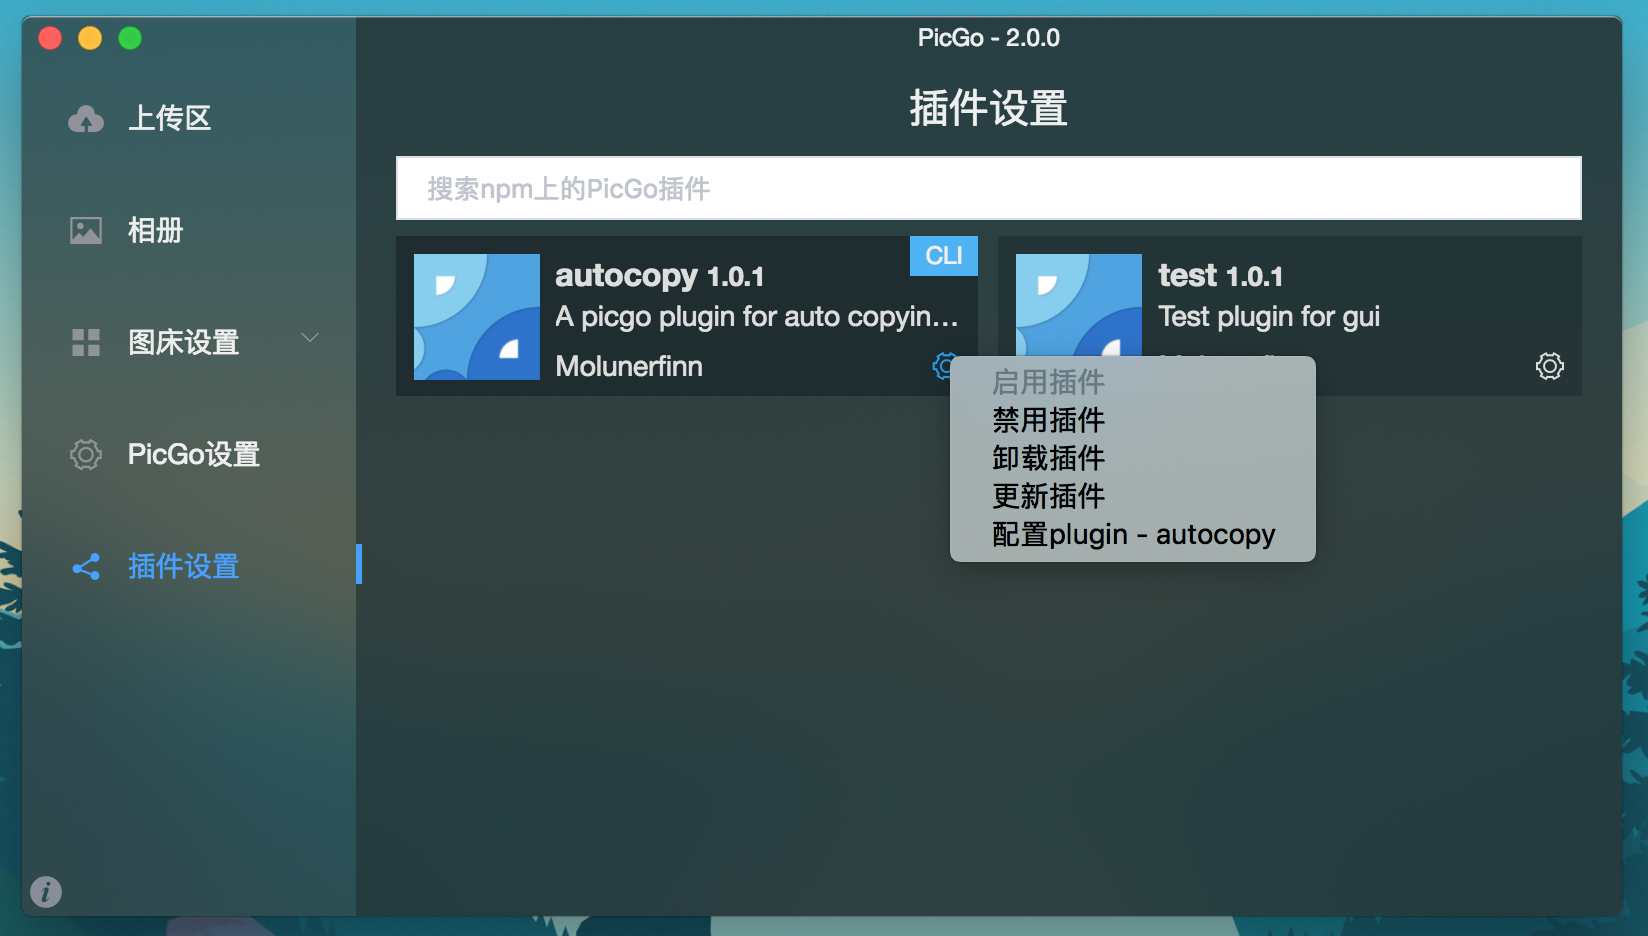
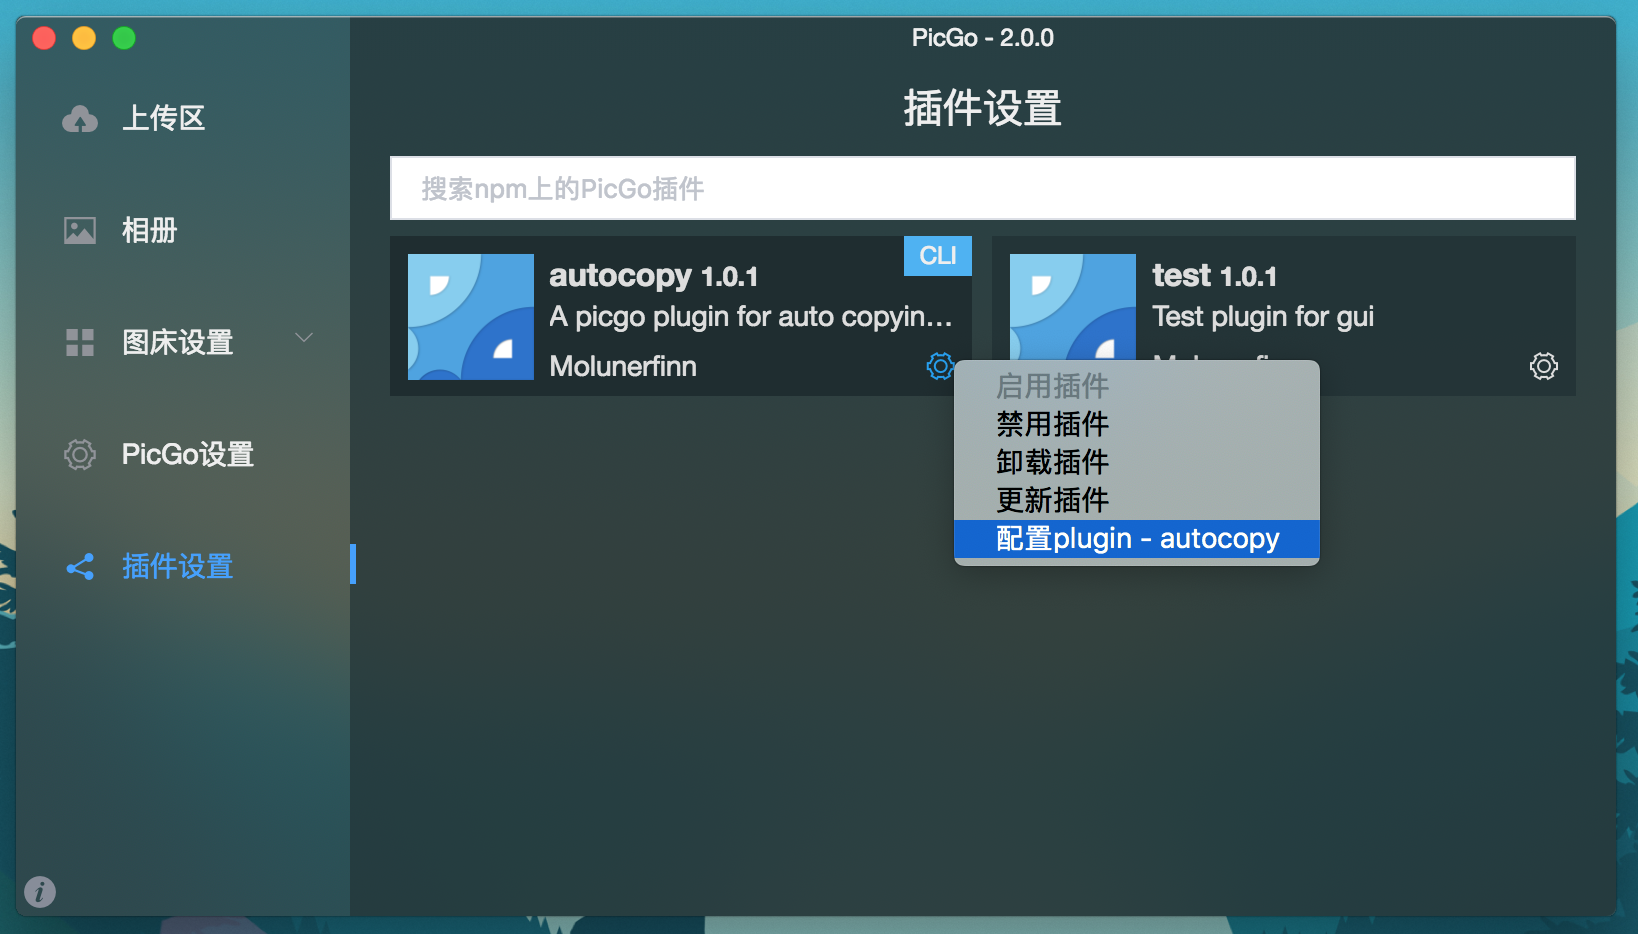
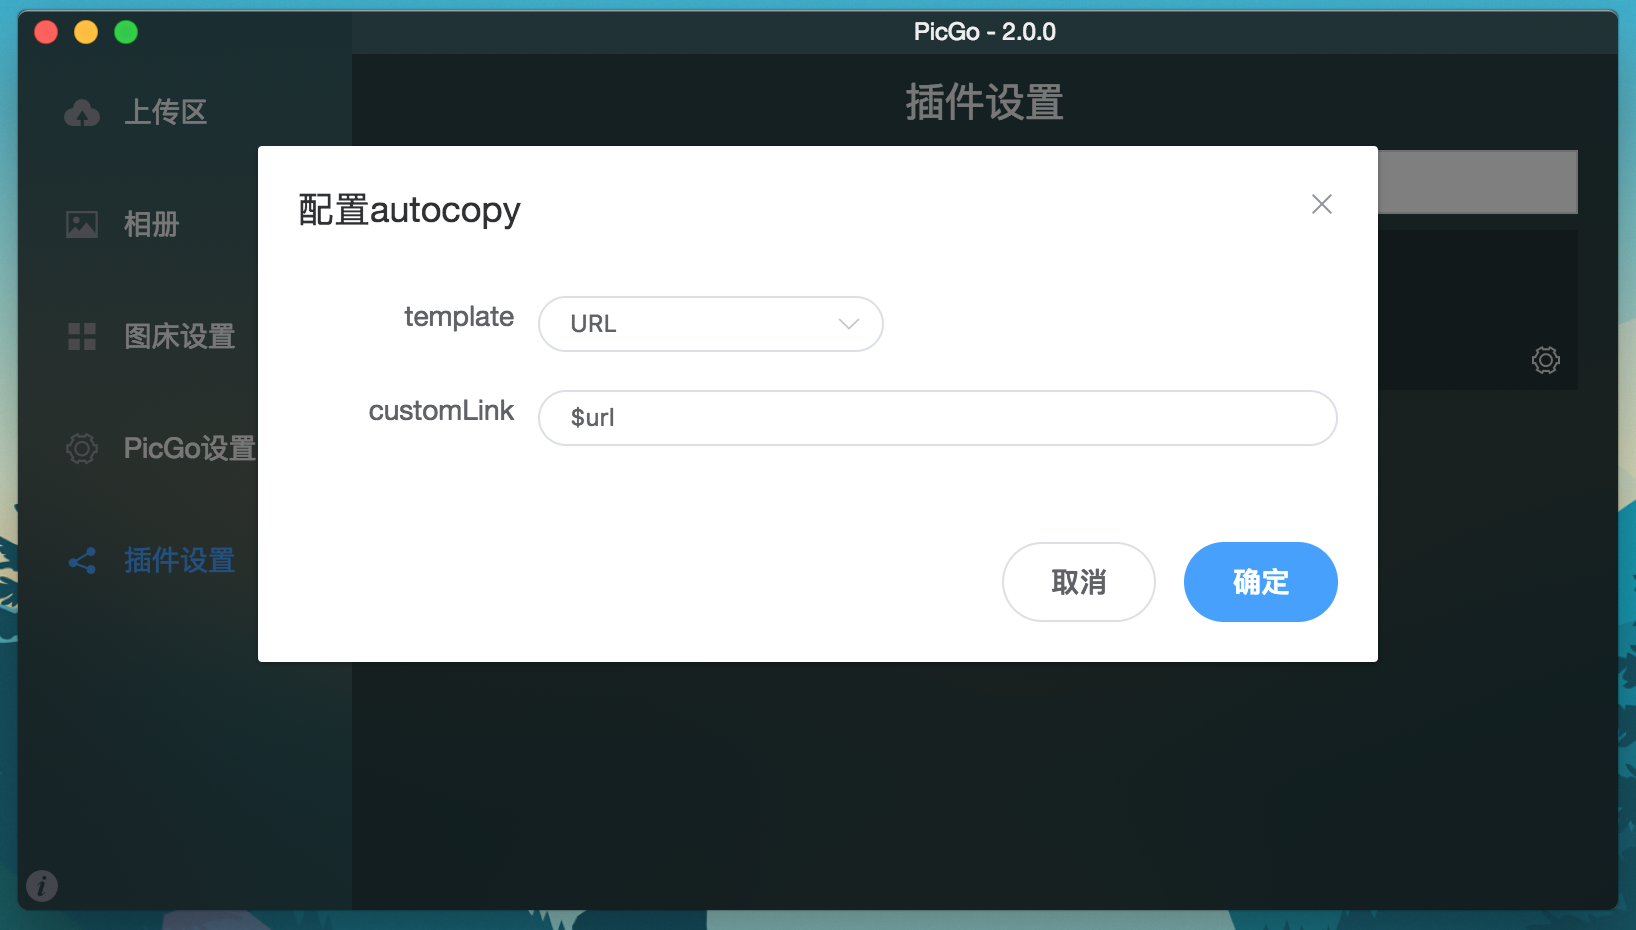
Plug-in Configuration
Some plug-ins has configuration option, click configuration to configurate:
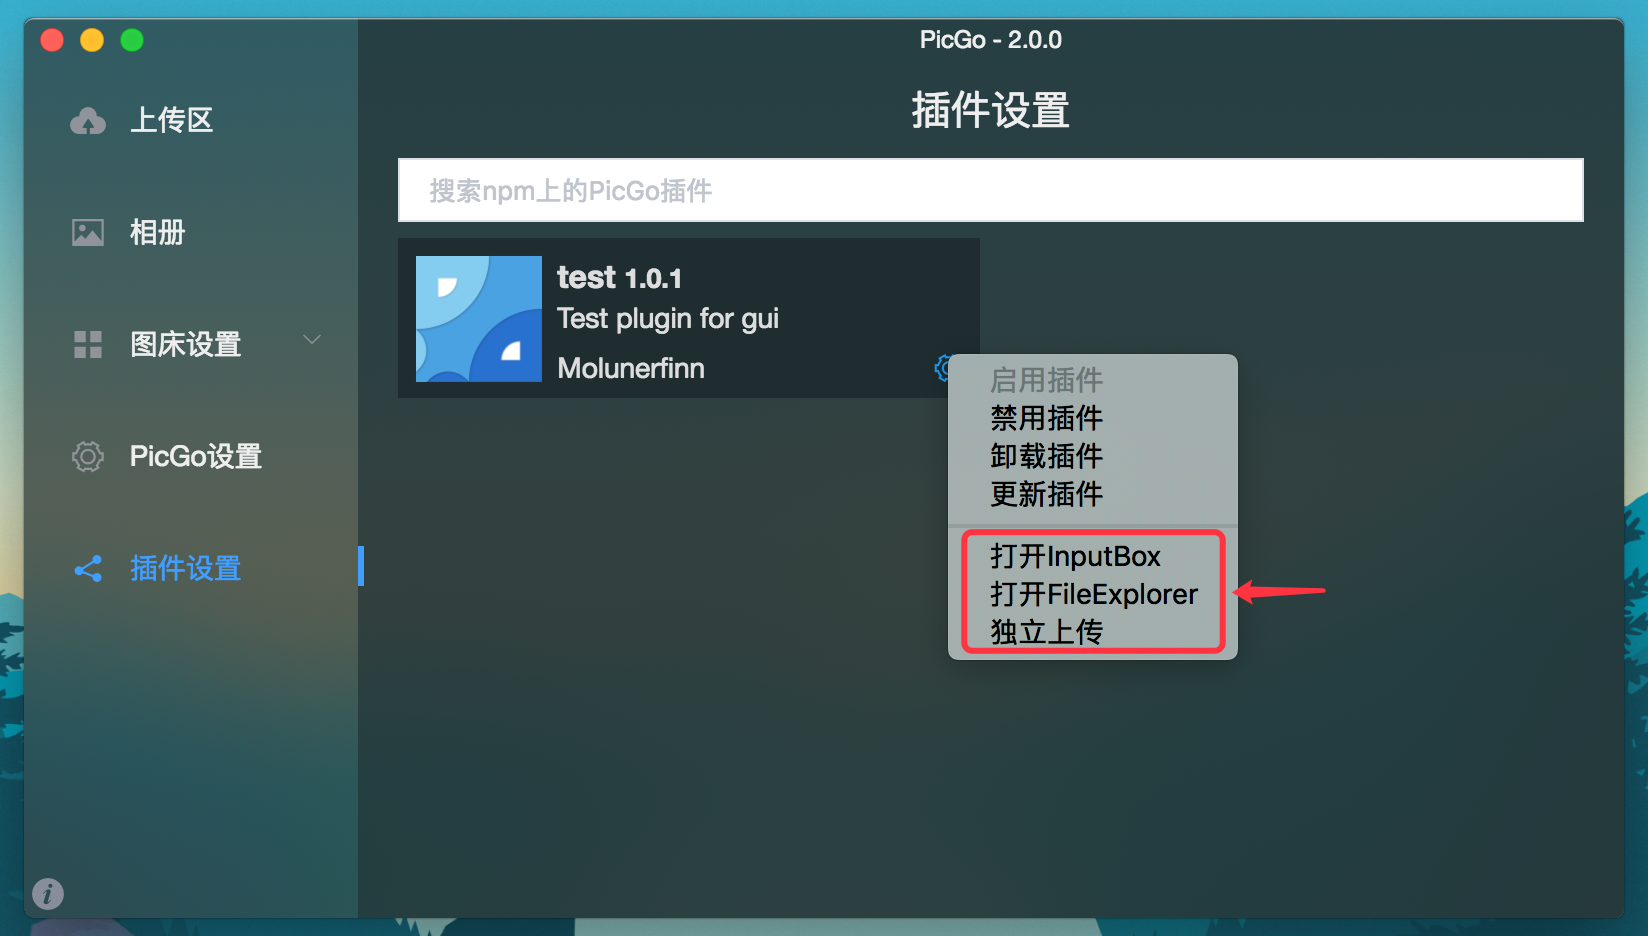
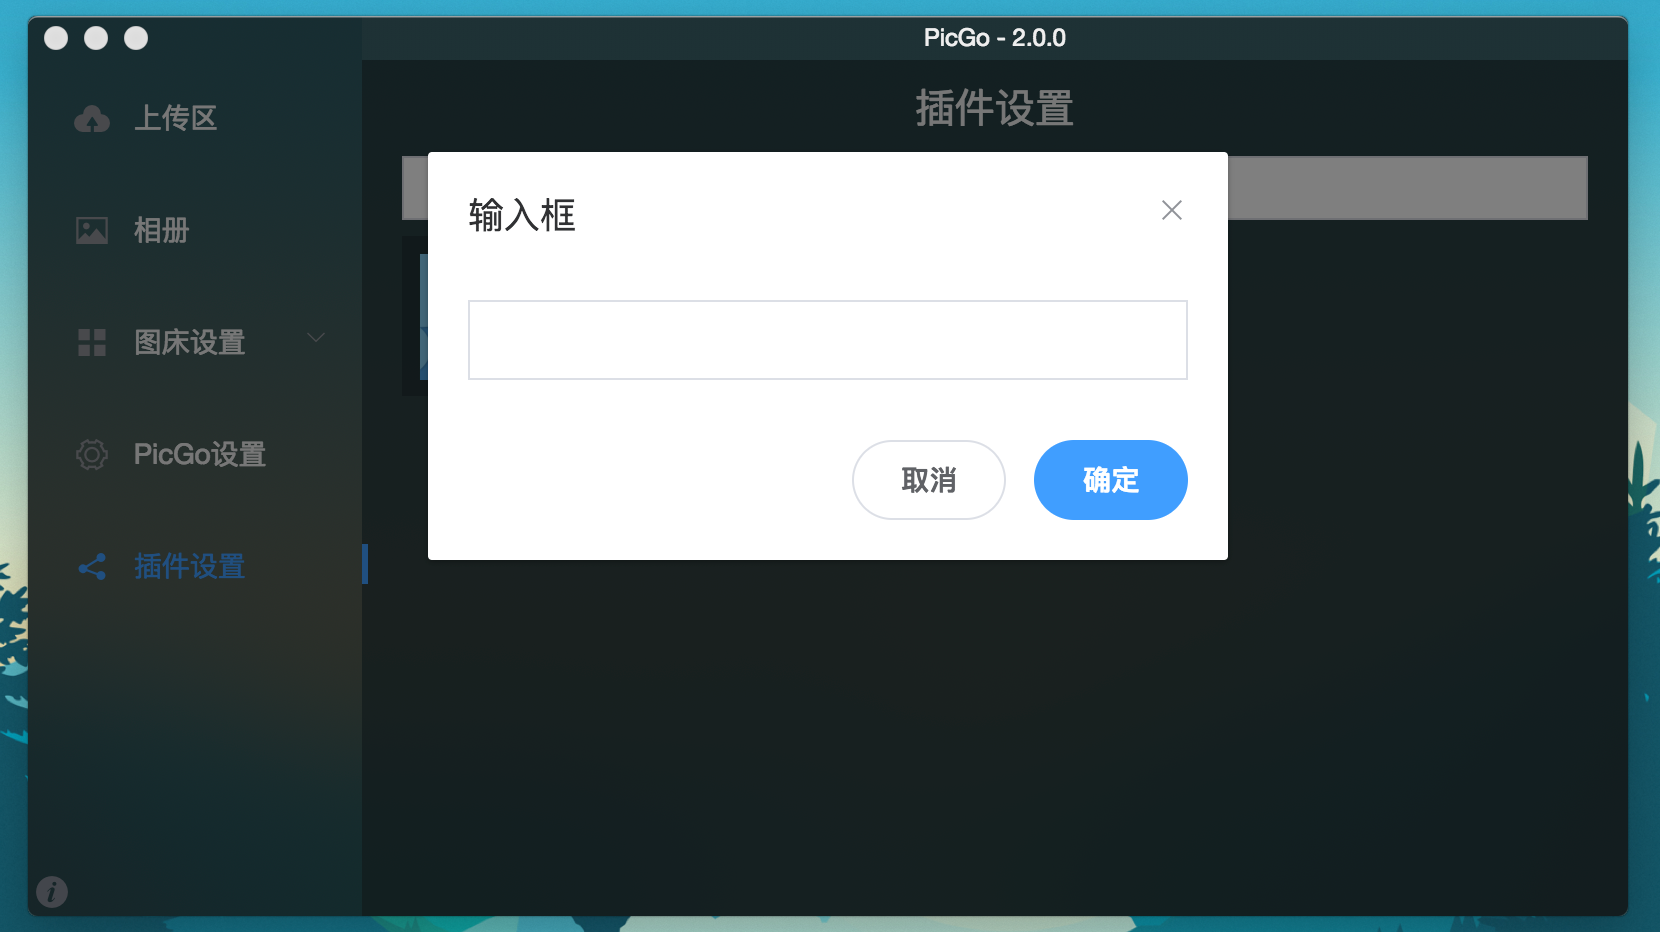
Plug-in Usage
Some plug-ins have their own menu items, you can find the plug-in's own menu and use:

Awesome PicGo Plug-ins
You can find some awesome PicGo Plug-ins in Awesome-PicGo (opens new window)~